Project - My Website
Introduction
About This Page
This is the main page of My Website project.
I will write down step by step of how did I build this website from scratch and all the relevant knowledge required, all the related links will also be shared in this page. And the most important thing, how did I learn from unknown, how did I resolve all the problems during this process. I’m sure there will still be a lot to learn while building this whole website and maintaing this page.
Inspired Video
First things first, I got inspired by a video (unfortunately, the original video was gone), but I found their website for the same setup - how to setup GitHub Pages
Main Parts Of My Website
In above video, it talks about how to build up and host a static website on GitHub, the most important part here is called minimal-mistaks, according to its GitHub page:
Minimal Mistakes is a flexible two-column Jekyll theme, perfect for building personal sites, blogs, and portfolios. As the name implies, styling is purposely minimalistic to be enhanced and customized by you 😄.
This website is built on top of minimal-mistakes (it’s a Jekyll theme with a lot of cool features, I will go through Jekyll later). It can build a pure front end website (no server side!) with normal stuff like HTML pages, JavaScripts, Style Sheets etc. and the website content is maintained in MarkDown, this is … great!!!😀
Apart from the website code and content setup, we also need:
- A place to host this website. In GitHub there is a feature which can host websites directly from a repository, it’s called GitHub Pages, and it’s FREE.
- A custom domain to publish my website. That’s why my website can be visited from krisshen.com instead of a GitHub URL. But normally a custom domain needs to be purchased and it doesn’t cost me much for this one… if I pick up website name wisely.
Build Up Steps
Setup Website Code
Website code is in minimal-mistakes Jekyll theme, there’re 3 ways to install this, details please refer minimal-mistakes#installation.
- I followed the 3rd way - directly copy - to setup my initial repository:
- Clone minimal-mistakes repository to my local
- Create a new GitHub repository, clone it to my local
- In my local copy “minimal-mistakes” directory’s content into my new repository’s directory
- Push them to my GitHub repository
- Above steps are enough to serve a static website on GitHub, once I enable GitHub pages then I would get an initial website. But it’s not enough to run it locally, so I also need to get my local develop enverionment ready:
- Install Ruby - because Jekyll is written in Ruby
- Install Bundler and Jekyll by running command:
gem install jekyll bundlerBecause minimal-mistakes requires Jekyll and Bundler.
- cd to my repository’s folder and run below command to get all dependencies installed:
bundle #or bundle install - Run following command to start up a local host:
bundle exec jekyll serve
- or run this command to start up a live reload local host:
bundle exec jekyll serve --livereload - note: if on Windows, above command may throw error asking for ‘wdm’, add this to .gemspec file, also
may need to re-install Ruby eventmachine library reference
- By default, the local host will be served at: http://127.0.0.1:4000
- Visit local host from browser, a default page should be shown.
Setup GitHub Pages
GitHub Pages feature is disabled by default, it’s easy to enable it.
- In GitHub go to my repository that I want to publish
- Click Settings
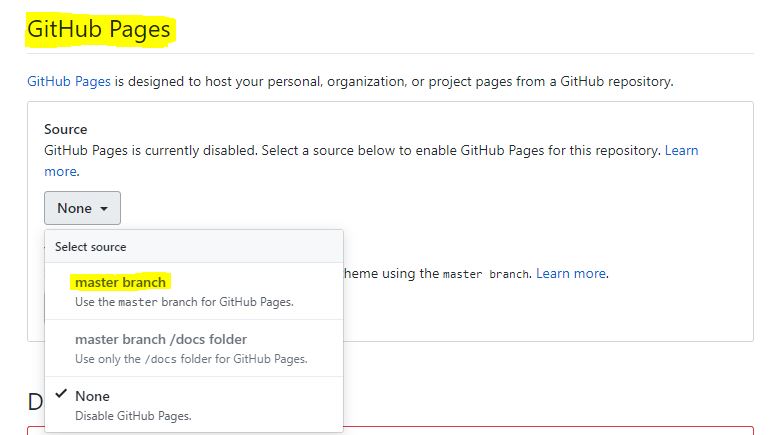
- In Setting page, scroll down to GitHub Pages section, select ‘master’ branch

GitHub Pages disabled by default. - Then the Settings page should be auto-refreshed, go back to GitHub Pages section, check it again.

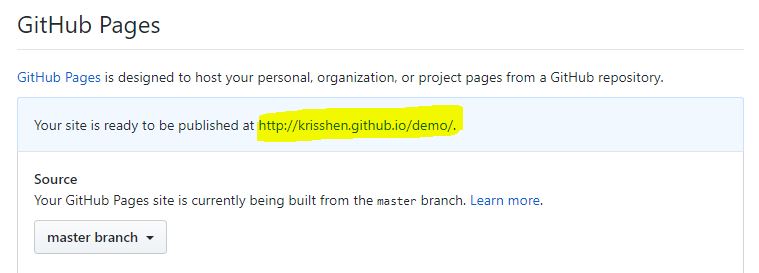
GitHub Pages enabled. - Access the URL to check published website.
Setup Custom Domain
- Buy a domain name - I bought my one from www.namecheap.com, please note, this is not the only domain registrar, there are unlimited choices out there. Even after purchase, some configuration is also needed, please check the video below from 9m52s, it covers how to configure domian settings in namecheap, for other domain registrars I believe they are all similar
-
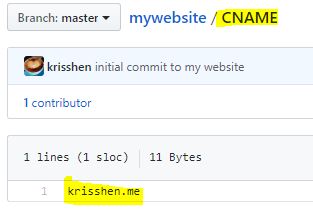
Create CNAME file in repository - In source code create a file named “CNAME” and place my new domain name into it

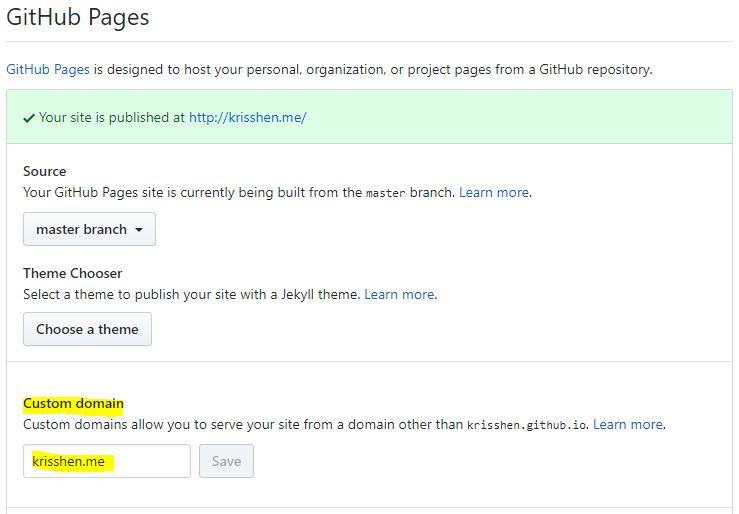
- In repository settings GitHub Pages section, set the new domain name and save it, give it some time to pick up my GitHub page, then access the new domain name, should be all set.

published to custom domain. - Reference: GitHub official document
Customization
Add Projects Page
Please refer this post: how-to-add-projects-page
Make Header Sticky
Please refer this post: how-to-make-header-sticky
Enable Table Contents
Please refer this post: how-to-enable-table-contents
Add WeChat Info
Add URL To Project Preview Image
Enable Page Update Time
Please refer this post: how-to-enable-page-update-time